I used to own an ‘04 G35 Sedan with a tape player and 6 CD changer. It had a satellite radio but no aux input. I went for a few months before I decided to add an aux input to play music from my phone. I’ll review the steps I went through to get everything working.
What You’ll Need
First, let’s take a look at all the tools and accessories you’ll need. The primary part you need to buy is the aux input adapter. There are universal kits and vehicle specific kits. I recommend the vehicle specific kit because it’s made for your vehicle. Connectivity and sound quality will be better than an FM transmitter.
Here are a couple resources:
- PAC – Search by Vehicle
- Choose your make, model, and year, then filter by category on the right. Choose Auxiliary Input Solutions
- Metra – Universal Stereo Audio Input
- This option is a physical input to the antenna on the back of your radio
You’ll also need the following:
- An adjustable wrench – to disconnect the battery cable
- A flathead screwdriver – to help in removing trim or dash
- Drill (optional) – to mount the input cable if desired
- RCA cable w/ 1/8″ stereo plug. 4′ or more in length to route the cable
- DIN removal tool (if required) – Search online for how to remove radio from your specific car make and model. You’ll need this tool if you find it’s a DIN system.
Preparation
First, make sure your car is in a secure location and turn it off. Engage your parking brake. Do you have enough light to work in the area? You may want to grab a light if not.
Now open the hood of your car and locate the battery. Newer cars have a cover over the battery. Remove the cover and find the negative terminal. It is labeled with the negative symbol and will have the black cable connected to it.
Use your adjustable wrench and disconnect the cable from the battery.
Remove the radio
Next we are going to take the radio out. But first you’ve got to find how to remove the trim surrounding the radio. My advice is to do a little research online and see how others remove the trim. Each vehicle is different. Be careful when removing the trim. Don’t accidentally disconnect any wires or environment controls. This is where the flat head screwdriver will come in handy.
Once you’ve removed the trim you need to identify how the radio is attached. Some manufacturers fasten the radio using screws and small bolts. Other manufacturers use a DIN system. Look for two small holes on the left and right side. These indicate a DIN system and you’ll need a special tool to remove it.
Begin to remove the radio and slowly pull it out. Watch out for the wires in the back and be careful not to damage anything.
Connect the Aux Adapter
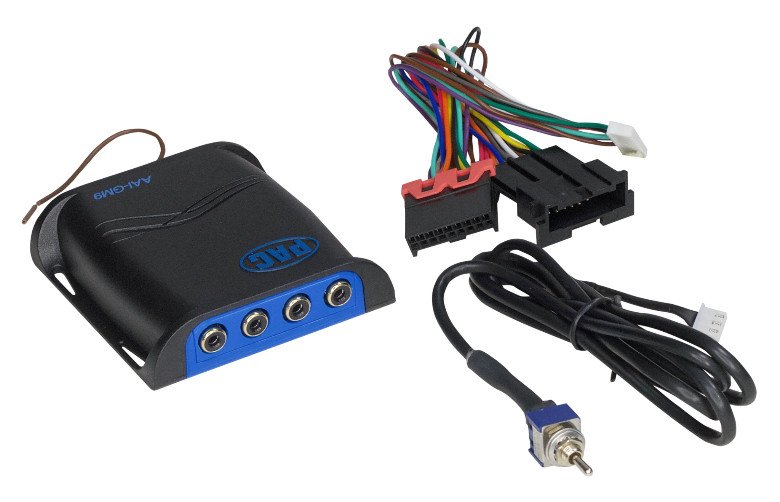
Unpackage the aux adapter and get it ready for installation. Look at the adapter and you’ll see it has an output cable and a receptacle to plug in a cable.
Unplug the connector from the back of your radio and plug it into the aux adapter receptacle.
Next, take the output of the aux adapter and plug it in where you removed the radio connector.
Connect the RCA cable to the red and white RCA connectors on the aux adapter.
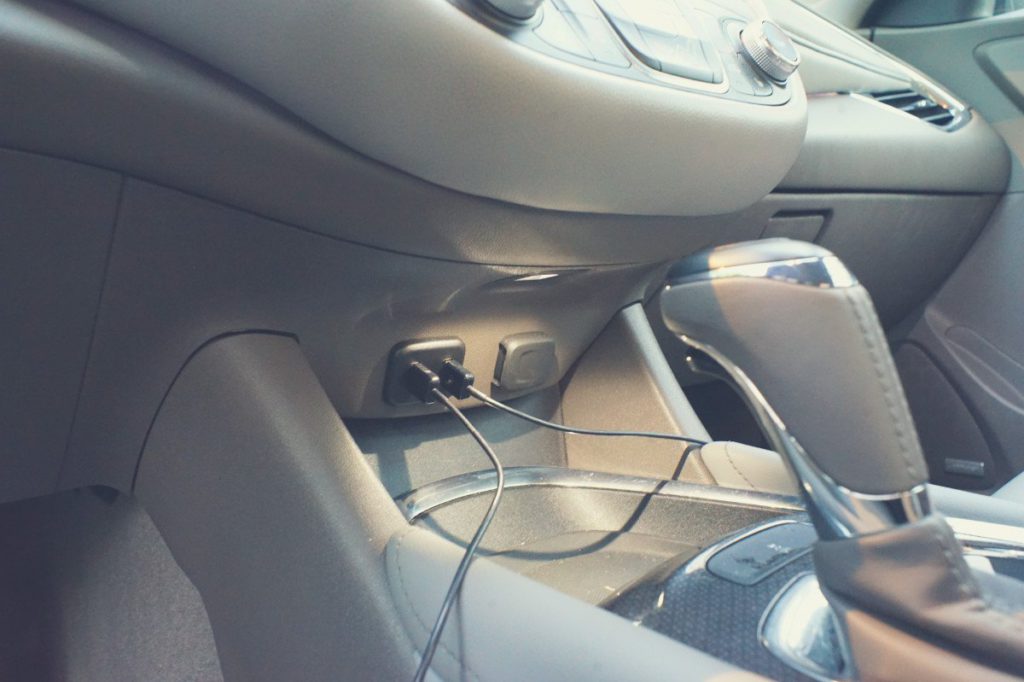
Now you need to route the RCA cable appropriately. First, decide where you want the cable to be. You can route it to the area between the two seats. Some people like to have a physical connector mounted under the dash.
You’ll need to fish the cable through the back of the radio compartment then down and out one side. When you get it out the bottom, try and hide under the dash or behind trim pieces so it’s not visible. Choose whether you want the ⅛” stock plug or if you want a receptacle. If you go with a receptacle you’ll need to mount it underneath the dash or inside the center arm rest.
Once you’re satisfied it’s time to test it and start putting things back together.
Test the Aux Input
Go back to the engine compartment and connect the negative lead back to the battery. This will restore power so you can test the radio. Turn the car on and then the radio on. Switch to the right input according to the Aux adapter manual and test it out by playing some music on your phone.
If you’ve got music playing, you’re good to go! If not, retrace your steps and try to troubleshoot the problem.
Replace radio and trim
You’ll need to find a good place behind the radio for the aux adapter to sit. See if there’s enough space behind the radio and carefully put everything back in place. Push the radio in while checking to make sure all the cables are in the right spot. Make sure you don’t pinch any cables.
Secure the radio and make sure it’s back in place.
Now reverse your steps from the trim removal section. Place the trim back, lock it in place, and make sure it snaps back together.
Summary
Now you’ve got a functioning auxiliary input! It was a little bit of work but definitely worth the effort you put into it. Playing music from your phone is more convenient than using a tape adapter or an FM transmitter. The quality is a step up and now you’ve got a permanent solution!