
The first car audio installation I ever did was in my Chrysler Town & Country Miniva. Oh boy. I was 15 years old and wanted some boom in my trunk. I figured out how to wire a 1,000 watt amp to three 12” woofers to make them sing. Boy did they sing! They most likely weren’t tuned right. I put them in any box I could find and the amp was certainly over-stating it’s capabilities. But at 15 years old, I didn’t know the difference!
Things have changed today and I’m more meticulous and careful in my planning. If you’re wanting to install a subwoofer in your car, I’ll review the process and help you along your way.
Preparation
Before I get to the installation instructions you need to do some prep work. You’ll need to gather some tools for the job. Also, you’ll need to select the right products which can have an impact on your future decisions.
Make sure you can dedicate the better part of a day for the install. Saturday’s are great install days. Expect to take 4-6 hours depending on how things go and if you run into any issues. Find a buddy to help you as well because extra help makes things go quicker.
Now is the perfect time to think about your long term goals. When I was a teenager I just wanted bass as loud as possible. Now I’m more concerned with sound quality. Do you want a loud system that others will notice or simply a little extra kick for some dance music? Think about where you want to go down the road.
Required Tools
First, gather the following tools and get them ready.
- Battery powered drill
- Wire strippers
- Linesman pliers
- Multi-bit screwdriver
- Adjustable wrench (crescent wrench)
- Electrical tape (if needed for splicing)
- Zip ties (may come in the amp wiring kit)
- Coat hanger to use as a fish tape
- Flashlight (I suggest a head mount light)
Product Selection
Which Subwoofer?
I installed an 8” Alpine woofer in my G35 and I was very satisfied. It didn’t take up much space and it gave enough bump to make my music enjoyable. It wasn’t overpowering at all. Decide what size sub and what brand you want.
Once you’ve made your decision see how much RMS (Root Mean Square) wattage it can handle. The amp you choose will need to supply that amount of power.
If you choose a Dual Voice Coil (DVC) you’ll have many ways to wire it to your amp. Crutchfield has a great resource on sub wiring diagrams. Rockford Fosgate also has an informative article.
Read this article also from Crutchfield if you want to learn the technical details matching an amp to a sub.
Which Amplifier?
Next up is choosing which amplifier to drive the sub. If you aren’t planning on replacing your car speakers I recommend a mono or 1-channel amplifier. These amps have features specifically for subwoofers like infrasonic filters and low-pass filters.
You should consider a 5-channel amplifier if you’re planning on powering your door speakers later. Cost increases at this level but you’ll have an amp that can do everything for the future.
If you don’t want a 5-channel amp now you can always add a second amp later. But that will mean removing trim pieces and pulling more power wires again.
Rockford Fosgate has a great resource on sizing amps for speakers.
Which Enclosure?
You’ve got a few options here for the enclosure type. First, look at the air volume requirements the subwoofer manufacturer recommends. If the enclosure is too small or too large the sub won’t sound the best. You do have the option of buying a sub and enclosure that will come together and made for each other.
If you’re interested in the details and would like a volume (Vb) calculator, take a look at Rockford Fosgate’s Woofer Box Wizard.
Different types of enclosures will alter the sound of the low frequencies. A completely sealed enclosure offers tighter and more controlled bass response. It also takes up less space in your trunk. If you are going for SPL (sound pressure level) and want something louder, go with a ported box. The bass is louder and sounds boomier. The last option is a bandpass box. This one has that slamming bass and hits very hard.
Wiring Kit
I recommend buying a wiring kit to save you time and money. You can buy everything separate but it’s not worth it. There are a few things you need to make sure it comes with. Look for a kit with zip ties, grommets (may need for the firewall) and ring terminals for the power wire.
Another piece of advice is about the copper speaker cable in the kit. Overseas wire manufacturers coat aluminum wire with copper. They call it copper clad aluminum (CCA). Manufacturers do this to sell at a lower price but it’s also lower quality and may affect the sound. Make sure the kit contains solid copper speaker wire.
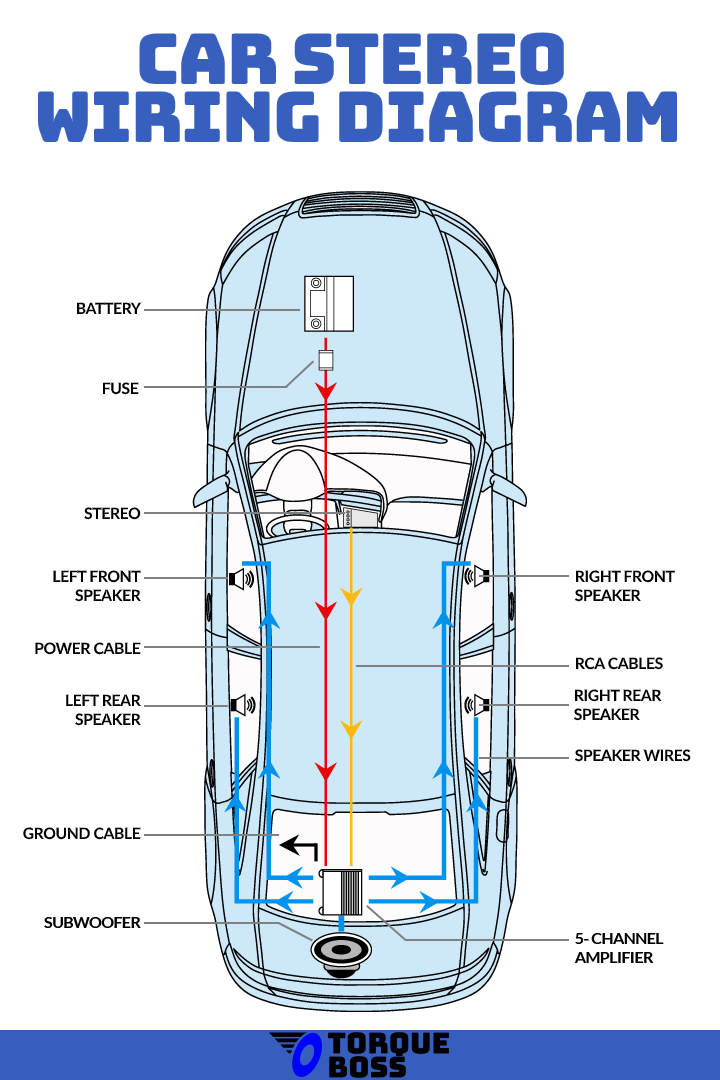
Infographic: Car Stereo Wiring Diagram
Installation
Now that the prep is out of the way let’s get down to the fun part!
Disconnect the Battery
Make sure your car is in a good location that has enough light to work. You don’t want to start working in the evening either before you lose light.
Turn the car off and open the hood. Locate the battery box and disconnect the negative terminal with your adjustable wrench. This ensures you work safely without the risk of electrocution or fire.
Run the Power Wire
The amp needs power so we’ve got to run the red power cable to it. This is the most difficult part of the installation but installers do it all the time so you can too. It just takes some effort.
Get it through the firewall
You need to find a hole in the firewall that goes to your engine bay. This hole will usually be up under the dash, above the brake and accelerator. Get up under there with a flashlight and see if you can find where a cable goes through. You won’t see a hole but you will find a rubber grommet that holds the cable.
Once you’ve found it see if you can push the red power cable through. If you have trouble this is where the metal clothes hanger comes in. Push the hanger through and then use the electrical tape to wrap the wire parallel. Now pull the hanger on the other side from inside the engine bay. It’ll take some work but you should be able to get it through.
Pull enough cable to route it to the battery.
Place the Power Cable
Next, place the power cable down the driver side all the way to the trunk or wherever you’ve chosen to locate the sub.
Look at the trim near the bottom of where the door closes. Get your flathead screwdriver and try to pry it up without damaging it. It’s held on by plastic clips that are broken easily. I’ve broken many of them.
There should also be enough space inside the trim to run your power cable. Lay the cable along the way and get everything in place. You may want to run it but not put the trim back until later in case you need to adjust things.
Terminate Power Wire to Fuse Terminal
Now it’s time to add the fuse at the battery. Go ahead and cut about 6” of the power wire at the battery. You’re going to add the fuse here.
Get your wire strippers and strip ½” off the three ends. Strip both ends of the 6” piece and then one end on the long power cable.
Take your fuse from the wiring kit and insert the long power cable in one side and the 6” power cable in the other side. Tighten the screws to secure the power cable to the fuse holder.
Don’t put in the fuse yet! Wait until the end.
Now take one of the ring terminals and terminate the other end of the 6” power cable to it. If it’s a crimp style you may need your linesman pliers to create a strong crimp. Squeeze hard and make sure it’s a secure connection.
The last step here is to connect the ring terminal to the positive battery terminal. Take your adjustable wrench and loosen the existing positive termination. Remove it, add the ring terminal of the power wire, and tighten it again.
Connecting the Subwoofer to the Stereo
Next you need to run the RCA cables to get the signal from your radio to the subwoofer. You have a couple options here depending if you have a factory radio or an aftermarket radio. Some factory radios may have RCA jacks on the back but older radios may not. I’ll review some of the options if not.
Remove the Radio
Examine the trim around the radio and see if you can find where it comes off. You may find some clips that hold it in place. My suggestion is to do a quick search online for how to remove the radio for your specific car model. The removal procedure will be different between vehicle manufacturers.
Once you have removed the fasteners or DIN clips carefully pull the radio out . Look at the back of the radio and see if you can find any RCA output connectors. They’ll be round and red and white in color.
You’re in luck if you see RCA connectors on the radio.
If you don’t see RCA connectors here are your options:
- You can splice the outgoing speaker wires and run a high level line via speaker wire to the amplifier. Your amp must have a high level input. Just double check the specs and make sure it does. This is where you’ll need the electrical tape and additional wire to make a tap off the rear speaker outputs.
- Another option is a line out converter. This takes the line level signal from the speaker wires and converts it to a pre-amp level for the amplifier.
Attach the RCA cables from your wiring kit and fish the cable behind the radio, under the cabin, and down the passenger side of the car. You want to run the RCA cables on the opposite side of the power cable to minimize any interference. Power cables emit electromagnetic interference (EMI) and can impact your audio signals.
If your amplifier requires a remote-on wire, now is the time to run it along with the RCA cable. Remote on tells the amplifier when to turn on. You’ll need to make a tap off a wire that has 12V signal only when the car is turned on. When it turns off voltage is gone and the amp turns off. You can probably find one behind the radio and can verify with a multimeter.
Follow the same process and run the remote-on and RCA cables all the way back to the amplifier. Hide the wires under carpet or under trim panels along the way.
Replace the radio and trim back where everything goes.
Adding a Ground Wire
At this point you need to determine where you’re going to mount the amp. Most people mount it on the back of the subwoofer enclosure. This is very convenient and the quickest solution. You could also add a platform or board behind your seats. When I removed the stock amp from my G35 coupe there was a perfect place under the rear trunk floorboard.
Next you need to find a grounding spot near the amp. Look under the carpet for a bolt that’s connected directly to the metal frame or body.
If you can’t find a suitable spot you’ll need to drill a hole and attach a self-tapping screw as your ground. Make sure to sand the spot to remove any coating to make a good connection
Double check the ground location again. This needs to be a solid connection for the amp to work properly. Manufacturers coat the metal car frame with a surface that prevents an electrical connection. Use sandpaper or a wire brush to scuff the surface.
Get the ground wire ready by stripping 1/2″ off the black ground wire from your kit and terminate it to a ring terminal.
Unscrew the ground bolt you located and insert it into the ring terminal. Reattach the bolt and fasten it securely.
Wire the Sub to the Amplifier
At this point you should mounted your sub in the box and wire it to the terminals on the box. Go ahead and do that now if you haven’t already.
Terminate the red power cable to the correct screw terminal (+) on the amp. Make sure you’ve got enough slack in the power cable and it’s not too tight.
Terminate the black ground to the correct screw terminal (-) on the amp.
Cut the right length of speaker wire for the subwoofer. Connect the sub to the amp. (+) on the amp to (+) on the subwoofer. (-) on the amp to (-) on the subwoofer.
Connect the RCA cables.
Testing the System
Congratulations if you’ve made it this far! Now it’s time to test everything and make sure it’s working properly.
First, place the fuse into the fuse holder at the car battery.
Next, reattach the negative battery terminal.
Turn the car on and verify you’ve got power to the amplifier.
Turn the radio on and test it out! You’ll need to make a few adjustments to your amp like the low pass crossover point and level. Adjust it to what sounds good and go with it!
Summary
Now that you’ve installed your own subwoofer it’s time to enjoy it! Additional bass really adds quite a bit of listening pleasure to any audio system whether at home or in a car. Now you also have some installation skills that are valuable for many other things.
Enjoy your new system!